how to tactically misuse
the "Inspector" tab
in the dev tools
as mentioned in the previous section on the core concepts, right-mouse clicking (or double finger clicking on a trackpad) on any element on a webpage/app will open the browser's context menu. in that section we discussed how even something as simple as using the "Save Image As..." option can have viral implications. so threatening is this default browser feature to the data barons that in some instances, like Instagram, they've added some extra HTML/CSS as a hack to disable this feature, but there's a way to hack Instagram's hack.
in that same context menu, if u choose the "Inspect" option the browser will open its developer tools with the "Inspector" (aka Web Inspector) tab open. this tab let's us inspect all of the HTML + CSS code which defines the particular page u're on... but it also let's u modify this code, which opens the door to some tactical misuse...
notice that there are two parts to this Inspector, the left displays an interactive panel of all the HTML code on the page while the right side displays an interactive panel of the CSS code corresponding to the HTML element currently selected on the left panel. if u've never written (or seen) any HTML + CSS code it's worth defining some terms && explaining some basic concepts (that siad, this is not the place for a full HTML/CSS tutorial, for a full introduction to these languages take a look at netnet.studio).
HTML + CSS
HTML stands for "Hypertext Markup Language" && it's the most important language when creating a website/app, its purpose is to structure all the content on a page, it does this by placing individual pieces of content within "tags". below is a diagram of an "opening tag" && a "closing tag" (differentiated by the / symbol) with some "content" in between, all together this is referred to as an HTML "element":

there are different types of elements && so as u inspect a page u'll notice different element "names" within the opening/closing tag's < brackets >. between an element's opening/closing tag u may find some text (like in the example above), but an element's content can also be another element. when an element has another element as its content, we refer to this element as a "parent" && the element between its tags as its "child". these "nested" elements are often hidden in the Inspector, but clicking the triangle icon next to each element's opening tag will display/hide its nested children in the Inspector.
HTML elements often also have "attributes", these are defined within the opening tag itself, after the tag's <name && before it's >:

these attributes are used to specify some detail or characteristic about that particular element. in the example above the <a> tag is the HTML element we use to turn pieces of text into clickable links, it's href attribute is how we specify where we want that link to go when we click it href="http://website.com".
as u click on different HTML elements in the Inspector you'll see it's CSS show up in the right panel. CSS stands for "Cascading Stylesheets", it's a special language used to change the look && layout of HTML elements. CSS code is usually a list of "properties" (like color, font-size, font-family, etc) && "values" (like "red", 24px, sans-serif, etc). that's all i'm going to cover here about HTML/CSS (as i said before, u can learn lots more at netnet.studio), while it helps to know more, u don't need to be an expert to experiment w/the Inspector, so w/that terminology out of the way, let's start hacking.
finding IG images
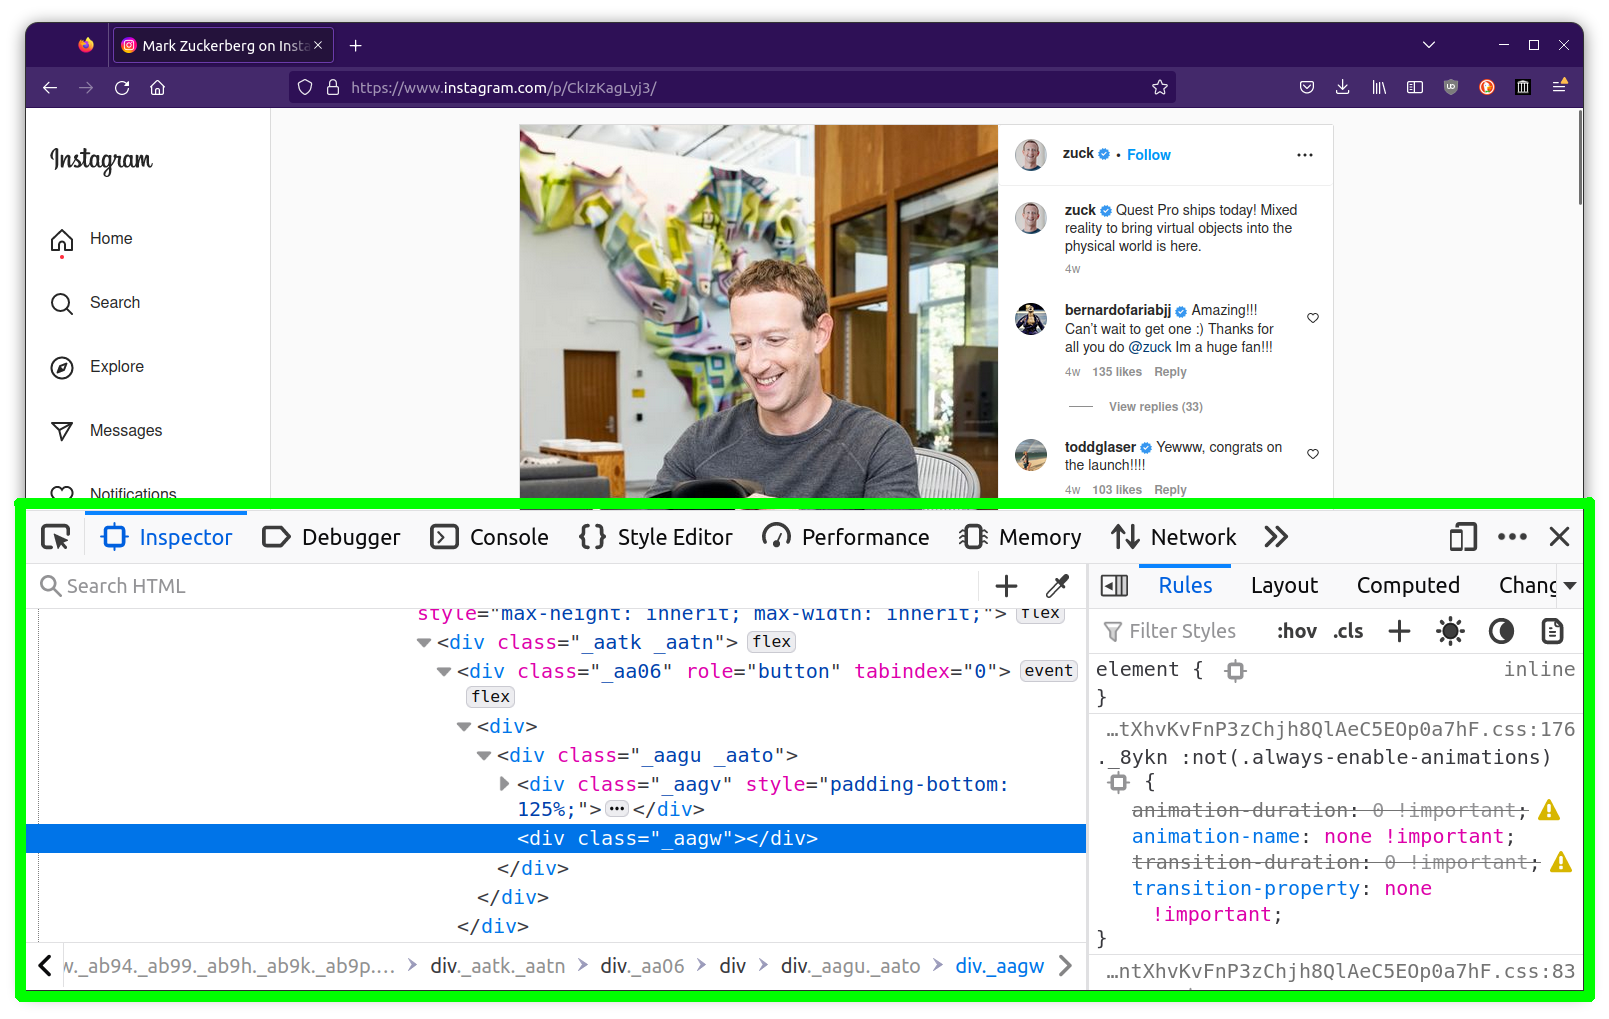
now we'll return to the Instagram hack. the way they were able to prevent the "Save Image As..." option from showing up in the context menu was by hiding the <img> element (the element which contains the actual image file) behind a <div>, && so when we right-click what appears to be the image on Instagram, we're infact clicking on the "div", which is why choosing "Inspect" opens up the Web Inspector w/that "div" element selected.
but if we take a look a the div element just above the selected div, clicking on it's triangle to display it's child elements, there we will discover the actual <img> element. the location of the image file itself can be found within the element's src="..." attribute. if we double click on the src attribute's value (the URL for the image we want to save) the Inspector should highlight the entire path for us, we can then copy it + paste it into a new browser tab && from there we can right-click > Save As
modifying the page
not only can we inspect any webpage/app's code to discover hidden elements like this, we can modify any of the elements. u can double-click the elements, the same way we did before to copy the image path, to also edit any of their attributes or content (u can also right click any element to access a context-menu w/more options for how to edit/delete any given element). try clicking on any random element && then modifying some of it's CSS values in the right panel, u should see changes take effect instantly.
NOTE: the code we're editing is the code that was sent to our browser from Instagram's server, meaning the changes we are making only effect us (not anyone else visiting the site), if we refresh the page (&& thus send a request to the server for a fresh copy of the code) our changes will disappear... still, there is a lot of power here.
for example, it's not uncommon to be reading an article online && suddenly we're blocked w/a paywall... or worse, we're forced to "log in" so that the website can identify us, valuable info when recording everything we do on the site to capitalize on the surveillance dividend. but that "login wall" is just another HTML element, which means we can remove it...
in the example video above i was reading a post on Quora on the subject of "surveillance capitalism" until i was forced to login, instead i right-clicked that element && opened the Inspector. i then added a piece of CSS code in the right panel, display: none; (which is one way we can make the element disappear). this worked, but it turn out the login box was inside another parent element, so i proceeded to add that same line of CSS code to it's parent element && it's parent's parent element.
this made the wall entirely disappear, but there were a couple of more issues, if i tried to scroll the page with my mouse's scroll wheel nothing was happening. additionally, the entire page was now blurred. preventing scrolling is common behind paywalls, this is usually accomplished by adding overflow: hidden; to the page's <body>, so i scrolled up to locate the "body" && clicked on it to access its CSS && then toggled off the "overflow" property, i could now scroll.
lastly, i scrolled through the other elements until i found one w/a CSS "blur" on it. i clicked on this element && then toggled off the CSS blur on the right panel, && voilà, i could now continue reading my article.
...
these are just a couple of examples on how the Web Inspector can be tactically misused to shift a bit of the power/control on these surveillance platforms. these are relatively simple examples, there's loads more u can do w/this Inspector, i suggest u spend time inspecting other sites && experimenting w/making modifications to the CSS code of random elements to start getting a feel for exactly what's possible. next, we'll tactically misuse the Console tab.